Cara Sharing Internet Modem/Wifi Melalui Kabel Lan

Artikel ini akan membahas Cara Sharing Internet Wifi/Modem Melalui Kabel Lan, maksudnya apa?, yaitu kita akan membahas tentang cara membagikan internet modem kita melalui kabel agar teman yang memerlukan juga dapat terkoneksi internet, ataupun ketika kita mempunyai koneksi wifi yang bisa internet, sedangkan teman kita tidak bisa, maka disini kita bisa membagikan koneksi wifi tersebut melalui kabel Lan.

cara sharing internet wifi/modem
Langkah2nya sangat mudah, pertama koneksi kan komputernya, lalu lakukan lah sharing, selesai deh :D
Tips Cara Mempercepat Koneksi Internet Gampang !
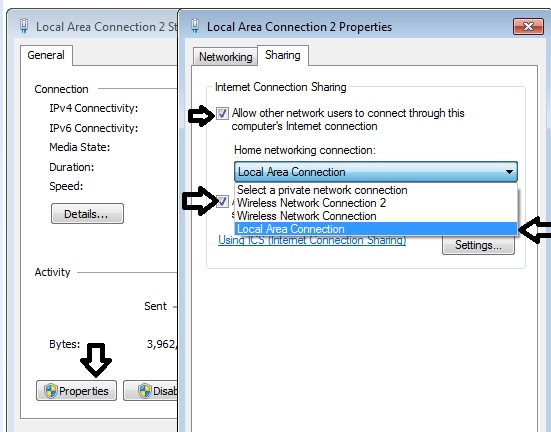
1. Koneksi kan komputer kamu ke internet melalui modem ataupun wifi, yang penting udah bisa internet, nama koneksi saya yang telah terkoneksi internet adalah Local Area Connection 2
cara sharing internet wifi/modem
2. Koneksi kan komputer kamu dengan komputer lain, jika belum bisa, saya sudah menyiapkan artikelnya, baca aja Cara Koneksikan Komputer ke Komputer Dengan Kabel UTP (Windows ke Windows). Saya telah menyambungkan komputer saya dengan komputer teman, nama koneksi nya adalah Local Area Connection 1.

3. Setelah itu kita akan melalukan sharing, klik Local Area Connection 2 (Koneksi yang terhubung ke internet), Lalu klik Properties, Pilih Tab Sharing yang diatas, lalu ceklis kedua kotak, dan pilih nama koneksi Local yang digunakan untuk menghubungkan kedua komputer, Klik OK OK trus.
cara sharing internet wifi/modem
4. Setelah selesai, seharusnya komputer satu lagi sudah bisa mengakses internet, jika tetap belum bisa maka coba matikan semua firewall.
Inti dari semuanya adalah, jangan salah memilih koneksinya, kamu harus tau koneksi mana yang bisa internet dan koneksi mana yang belum bisa internet.

Cara Sharing Drive di Windows 7

BayuHades - Sharing Drive di windows 7 memiliki perbedaan dengan sharing folder/file yang berada di dalam Drive C / D. Windows 7 memiliki security yang lebih dalam memproteksi dalam networking sharing Drive/Folder. 
Mungkin teman - teman blogger pernah melihat pesan ini ketika mencoba membuka Drive / Folder ketika sharing data :
"Access denied. Contact your administrator"
Padahal sudah mematikan Windows Firewall dan juga sudah Turn On File Sharing serta Turn Off Password Protected pada Sharing Setting namun pesan error tersebut terus muncul dan anda tidak bisa membuka Drive / Folder yang anda inginkan.
Sebelum Sharing Drive / Folder / File Ubah Advanced Sharing Settings
Caranya Masuk ke :
Control Panel>All Control Panel Items>Network and Sharing Center>Advanced sharing settings
  1. Home or Work (Current Profile)
  2. Turn On Network Discovery
  3. Turn On File and Printer Sharing
  4. Turn on sharing so anyone with network access can read and write files in the Public folders
  5. Turn off password protected sharing
  6. Allow Windows to manage homegroup connections (recommeded)
  7. Save Changes
  8. untuk Public lakukan hal yang sama

Matikan Firewall terlebih dahulu
Caranya masuk ke :
Control Panel>All Control Panel Items>Windows Firewall
Pilih Menu "Turn Windows Firewall on or off"
Turn off Windows Firewall (not recommended) (Ada 2 Option, Turn Off keduanya)
Mengubah Security Drive C / D Terlebih dahulu
Caranya ikuti langkah - langkah dibawah ini :
1. Buka Windows Explorer, klik Kanan Drive C / D


2. Pilih "Tab Security" > "Edit"
3. Pilih "Add" untuk menambahkan User Permissions
4. Pilih "Advanced" untuk mulai mencari user yang akan ditambahkan
5. Pilih "Find Now" > Klik "Everyone" > Klik "OK" untuk menambahkan Everyone sebagai User
6. User "Everyone" sudah masuk kemudian klik "OK"
7. Klik "Everyone" > Centang "Full Control" > Klik "OK". Selesai
8. Selanjutnya Sharing Drive / Folder yang anda inginkan. Caranya klik Kanan Drive / Folder kemudian pilih "Properties". Pilih "Tab Sharing" > "Advanced Sharing..."
9. Centang "Share this folder" > Klik "Permissions"
10. Pilih "Everyone" > Centang "Full Control" Lalu "OK". Selesai
11. Alamat Sharing Drive / Folder 
12. Atau Klik "Windows + R (Run)" > \\192.168.32.1 (Alamat IP atau Alamat Sharing Drive diatas)
13. Selesai. Semoga Berhasil
Catatan :
Untuk Sharing Drive C sama namun jika keluar peringatan saat memasukkan user Everyone saat mencentang Full Control pilih "Continue" terus dan "OK"

Transfer Files Between a Windows 8 PC and a Windows 7 PC

00_network_drive_in_explorer
Have you installed Windows 8 on a spare PC and now need to get files from that PC to your Windows 7 PC, or vice versa? It is easy to network the two machines if they are both on your home network.
We’ll show you how you can share files between a Windows 8 PC and a Windows 7 PC by sharing a folder on the Windows 7 machine and then mapping to that folder in Windows 8 as a network drive.
First, you need to share a folder on your Windows 7 PC. You could just share your C: drive and have access to all folders from Windows 8. However, we recommend you create a special folder for transferring files. That way, you limit access to your Windows 7 PC.
Create a new folder somewhere on your Windows 7 PC, right-click on it, and select Properties from the popup menu.
01_getting_properties_of_folder
On the Properties dialog box, click the Sharing tab and then click Advanced Sharing.
02_clicking_advanced_sharing
On the Advanced Sharing dialog box, click the Share this folder check box to turn on sharing for this folder. Then, click Permissions.
03_clicking_permissions
On the Permissions dialog box, you’ll see Everyone listed in the Group or user names list. You can leave that is there are other users on your Windows 7 PC who you want to have access to this folder from the Windows 8 PC. If that’s the case, click the Full Control check box in the Allow column to give full read and write privileges and click OK.
However, we will also show you how to restrict access on the Windows 8 PC to your user account only on your Windows 7 PC. Click on Everyone in the Group or user names list and click Remove.
04_removing_everyone
Click Add.
05_clicking_add
On the Select Users or Groups dialog box, type your username for the Windows 7 PC in the Enter the object names to select box. Click Check Names.
06_clicking_check_names
The Windows 7 computer name is added to your username. Click OK.
07_closing_select_users_or_groups
You’ll now see your username in the Group or user names list. Select it and click the Full Control check box in the Allow column to give yourself full read and write privileges for the folder and click OK.
08_clicking_full_control_and_ok
You are returned to the Advanced Sharing dialog box. Click OK to close it.
09_closing_advanced_sharing
Then, click Close to close the Properties dialog box for the folder.
10_closing_properties_dialog
Before mapping to your new shared folder on your Windows 7 PC, you need to know either the IP address of your Windows 7 PC or the computer name. To check the IP address for your PC, open the Start menu, type “cmd” (without the quotes) in the search box, and press enter when the “cmd.exe” link is highlighted in the results. At the command prompt, type the following command:
ipconfig /all
You’ll see a list of connections display. It may be a long list, depending on how many LAN and wireless connections you have. Look through the list until you find an IP address for the appropriate adapter. We are using Windows 8 in a virtual machine using VMware, so the IP address we need to use is in the “Ethernet adapter VMware Network Adapter VMnet8” section.
10a_checking_ip_address
However, if you are running Windows 8 on a physical machine that is connected wireless to your home network, along with your Windows 7 machine, you’ll probably find the IP address you need to use in the “Wireless LAN adapter” section.
10b_checking_ip_address_wireless
To check the name of your Windows 7 PC, right-click on Computer on the Start menu and select Properties from the popup menu.
10c_getting_properties_of_computer
Your computer name is found in the Computer name, domain, and workgroup settings section of the System window that displays.
NOTE: Make a note of both the computer name and the IP address for your Windows 7 PC. Even if you want to use the computer name, you should know the IP address in case using the computer name doesn’t work.
10d_computer_name
Once you have the IP address and computer name for your Windows 7 PC, switch to your Windows 8 PC and click the Desktop tile on the Start screen.
11_clicking_desktop_tile
Click the Windows Explorer icon on the Taskbar.
12_opening_windows_explorer
In the navigation pane on the Explorer window, right-click on Network and select Map network drive from the popup menu.
13_selecting_map_network_drive
Select a drive letter to use from the Drive drop-down list. Enter either the path to the folder you shared on your Windows 7 PC using either the computer name or the IP address. The image below shows the IP address being used. Be sure to use two backslashes before the IP address or computer name and one before the name of the shared folder. If you want to reconnect to this folder every time you log into Windows 8, select the Reconnect at sign-in check box. Click Finish.
14_map_network_drive_dialog
As an example, the following image shows us connecting to the shared folder using the Windows 7 computer name.
15_map_network_drive_dialog_using_pc_name
You may see the following dialog box, if the connection is taking a while, or if it is not working.
16_attempting_to_connect
If the Windows 7 PC was found, the Windows security dialog box displays. Enter your user name and password for the Windows 7 PC. If you selected to reconnect at sign-in when mapping the network drive, you might want to select the Remember my credentials check box, so log in to the folder on your Windows 7 PC will be automatic. Click OK.
17_enter_network_password
You may see a message telling you that “Network discovery and file sharing are turned off.” If so, click the message and select Turn on network discovery and file sharing from the popup menu.
18_network_discovery_not_on
The Network discovery and file sharing dialog box displays, asking if you want to turn it on for all public networks. We recommend that you select No and only turn on network discovery and file sharing for private networks, for security reasons.
19_selecting_private_network
You should now see your shared folder from your Windows 7 PC under Computer in the Navigation pane in Windows Explorer.
20_shared_folder_as_network_drive
Now, you can play around with Windows 8 and be able to transfer any files you create or download in Windows 8 to your Windows 7 PC, as well. You can also put files in the shared folder from your Windows 7 PC and copy them to your Windows 8 PC. This is useful for testing software you’ve already downloaded for Windows 7 in Windows 8.

PC Station; Solusi Penghemat Listrik

Beberapa waktu lalu saya mengerjakan sebuah Lab Komputer di sekitar Cikeas (tapi bukan milik SBY lho?). Sedikit gaptek rasanya untuk seorang teknisi seperti saya melihat sebuah Lab Komputer dengan penggunaan PC Station.


PC Station digunakan sebagai Client, dan sebagai Host/Server digunakan sebuah CPU. Jelasnya, kebutuhan komputer Server dan Client adalah:

Server: 
- Monitor
- Keyboard
- Mouse
- CPU
- Kabel LAN
- Switch

Client:
- Monitor
- Keyboard
- Mouse
- PC Station
- Kabel LAN


Kelebihan PC Station jelas dalam hal penggunaan listrik, harga dan biaya pemeliharaan. Sebuah PC Station hanya membutuhan listrik 5 watt, jadi kebutuhan sebuah PC hanya sekita 50 watt jika menggunakan LCD Monitor.

Harga sebuah PC Station yang relatif lebih murah dari pada sebuah PC, tentu menjadi pertimbangan berikutnya. Dan selanjutnya adalah biaya pemeliharaan/maintenance. Karena hanya sebuah CPU yang digunakan, tentu lebih mudah dan murah dalam perawatan.

Kekurangan sebuah PC Station adalah dalam penggunaan program-program grafis yang berat seperti Disain Grafis dan Games.

PC Station cocok untuk digunakan di Lab Komputer, Kantor dan Warnet.

Cara Koneksi Lan antar PC

Buat pemula seperti saya mudah-mudahan dengan artikel ini sedikitnya bisa membantu ya udah Langsung aja neh..
UNTUK KOMPUTER PERTAMA ATAU PC - 1
Langkah pertama klik pada start yang ada di sudut kiri bawah monitor kemudian cari control panel, lalu klik pada Network and Internet Connections pilih, dan klik pada Network Connections
Lalu pilih Lokal Area Conetion, yang biasanya ada gambar segitiga berwarna kuning dan ditengahnya ada tanda seru (!), pertanda belum ada koneksi lanjut, kemudian klik kanan pada Lokal Area Conetion pilih Propertis

dan akan muncul jendela Conetion Propertis, Lihat Gambar dibawah

pada tab General ada banyak pilihan kita pilih Internet Protocol (TCP/IP), lalu klik Propertis, dan muncul jendela Internet Protocol (TCP/IP) Properties, Aktifkan Use the following IP address: jika sudah aktif maka kolom akan terbuka lalu kita isi dengan nomor 192.168.0.1 tekan TAB pada keyboard untuk pindah ke kolom dibawahnya, secara otomatis akan terisi dengan nomor 255.255.255.0 kemudian tutup jendela dengan menekan tombol OK
Begitu saja dulu setting pada komputer pertama
UNTUK PC KEDUA / KOMPUTER YANG SATUNYA
Lakukan langkah yang sama seperti diatas, pada PC ke-2 atau komputer yang lainnya Cuma ada sedikit perbedaan jika sudah memasuki jendela Internet Protocol (TCP/IP) Propertis, anda masukan angka 192.168.0.2 Pada kolom (IP address)yang berada paling atas, lakukan TAB untuk pindah ke kolom berikutnya dan secara otomatis akan menampilkan angka 255.255.255.0. Pada kolom ke tiga anda isi dengan nomor IP dari PC pertama yaitu 192.168.0.1 tutup jendela dengan menekan tommbol OK.
Nah sekarang koneksi sudah tersambung, tapi masi ada beberapa langkah lagi untuk memindah atau mentrasper data antar PC-nya.
Ini dia langkah langkah untuk memindahkan atau mentransper data supaya bisa dibaca pada PC atau komputer satu dengan komputer lainnya
Langkah Pertama anda buka Windows Explorer kemudian anda klik pada drive yang akan di sharing Misalkan dive D:, yang dipilih, dengan nama ARSIP (D:) nah kita klik kanan pada drive tersebut lalu pilih Propertis

Kemudian akan muncul jendela ARSIP (D:) lalu kita pilih tab Sharing kemudian arahkan kursor anda pada if you understand the risk but still want to share the root of the drive, click here, yang berwarna biru itu tu...

Lanjut setelah di klik ada dua lokal nah kita pilih yang kedua Network sharing and security, yang bergambar tiga monitor, klik pada Network Setup Wizard akan muncul jendela Network Setup Wizard,
Waduh cape kepanjangan nih... ya udah lebih jelasnya bisa ambil tutorialnya dengan format pdf atau doc
DOWNLOAD .pdf
DOWNLOAD .doc
Oh ia lupa nih buat teman-teman yang mungkin lom memasang Acrobat Reader untuk membuka file (*.pdf) nya saya kasih software nya gratis juga ko Acrobat Reader atau mungkin teman-teman punya yang lebih bagus dari ini, gak apa-apa kan